Getting Started
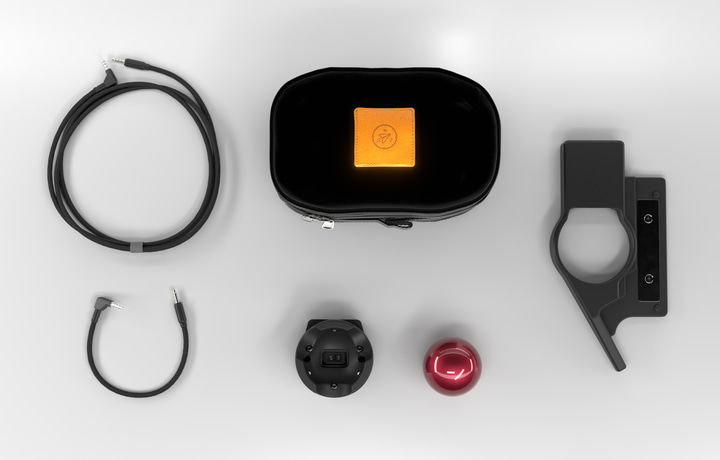
What’s in the box?
- Shell: Left, right, or none - depending on your order.
- Core: Either the Trackball or Trackpad.
- Cables: TRRS cables, one short and one long (not included with "Just the core").
- Carrying Case: Custom made for the Navigator (not included with "Just the core").
If you opted for "Just the core", you will have the core only (no shell, cables, or carrying case).
Connecting the Navigator
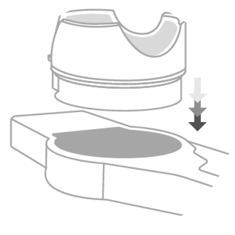
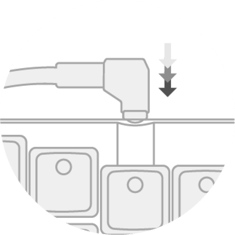
Gently push the module into the shell. It should just “pop” in, this doesn’t need force. You’ll know it’s in when you feel it click.
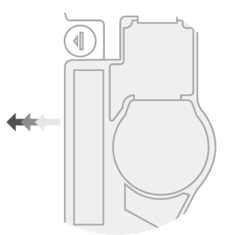
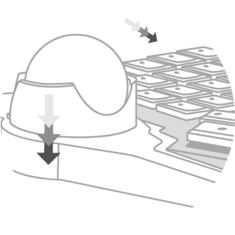
The Navigator attaches to the Voyager using magnets. Just bring the shell to the side of the Voyager, and it will snap right into place.
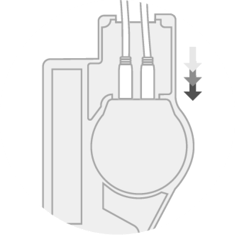
Turn the Voyager side with the Navigator over, and connect the two TRRS cables to the module. Plug the straight connectors in, and push firmly to make sure they are properly plugged in.
Note: The shorter cable goes in the port closest to the Voyager.
Connect the TRRS cables to the Voyager, using the right-angle connectors. Shorter cable goes to the Navigator connected side, longer one to the opposite. Then you can connect the USB-C cable to power on your keyboard.

The final look. Your Voyager is almost ready to mouse!
Configuring the modules
The first time you plug in your Navigator, the module will not respond. We'll need to modify the Voyager's layout, add a Navigator with one of the plus icons, then compile and flash the new layout to the board.
You’ll do this in Oryx as shown in the video below.
When flashing your keyboard through Chrome, you will need an external mouse connected. This isn't needed when flashing through our Keymapp tool.

Getting Started with the Trackball
This video provides a quick overview of the Navigator Trackball keys and advanced settings. This is also explained in the text below, but if you prefer watching, this is a good place to start.
Getting Started with the Trackpad
When you first unpack your Navigator trackpad, you’ll see there is a film on the trackpad surface. This is just a plastic protector you should pull off before using.
This video provides a quick overview of the Navigator Trackpad keys and advanced settings. This is also explained in the text below, but if you prefer watching, this is a good place to start.
We are constantly improving and adding features to Oryx for the Navigator, so the UI and features shown in the videos above may differ slightly. Make sure to take a look under "Advanced Settings" to see other options, and send us an email (contact@zsa.io) with any questions.
The Trackball auto-mouse layer
By default, the Navigator Trackball adds a Mouse layer to your layout that activates when you move the mouse and deactivates after a set period of time, the Auto-mouse deactivation delay. There are quite a few ways you can set up your auto-mouse layer, or even not use one at all. Experiment with the defaults first, and if you want to change things, check out our deep dive into the auto-mouse feature on our blog.
The Navigator Trackpad does not add a mouse layer automatically because it isn't necessary. You can mouse around, click, and scroll all with the Trackpad itself. You may just want to add left click as a held action to one of your keys. That will let you drag things while you hold it. Everything else happens onboard the Trackpad.
Getting used to your Navigator
Transitioning to the Navigator Trackball or Trackpad takes practice. Don't throw out your mouse just yet! It will take time to get comfortable with the Navigator and find what settings work for you. Be patient with yourself while you get used to everything.
Remember that you don't need to fully switch right away. Some movements and actions may feel frustrating and slow at first. It's completely okay to keep your regular mouse by you so you can switch back and forth. Over time, you’ll find yourself using the Navigator more and more often.
Navigator Keys
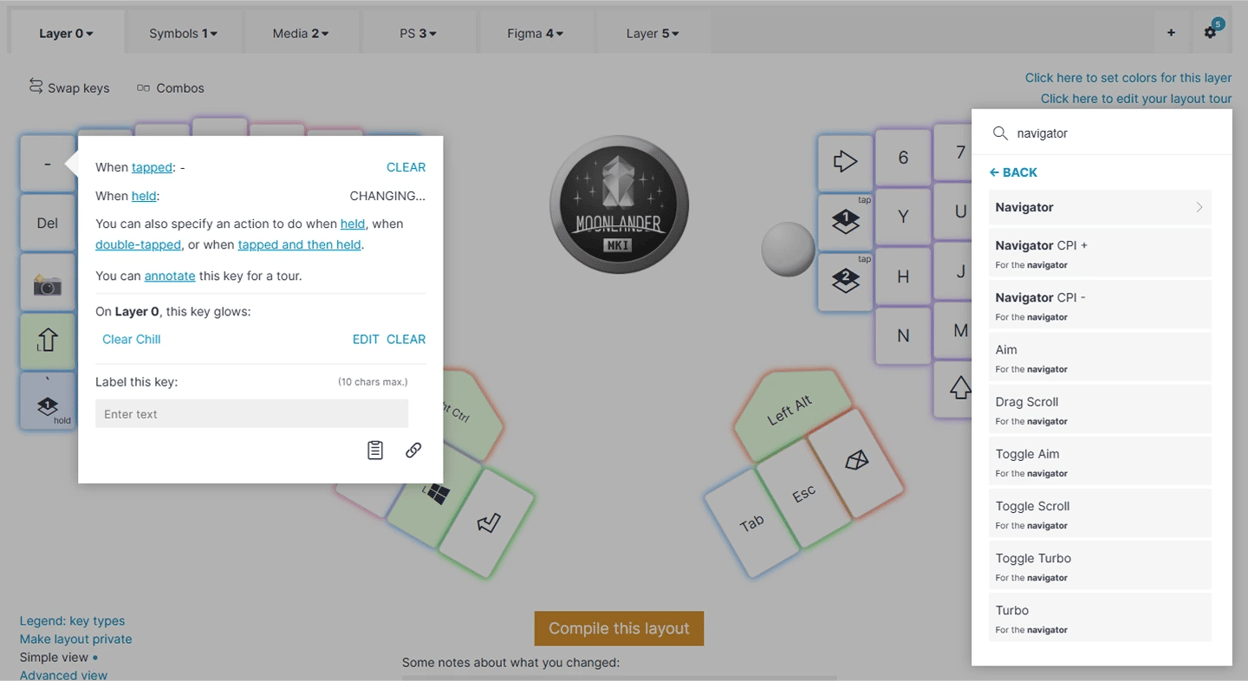
When adding a Navigator, you will have access to a new selection of Navigator keys to assign in your layout. You can see all of these by searching for “Navigator” when assigning a key in Oryx.
Navigator settings
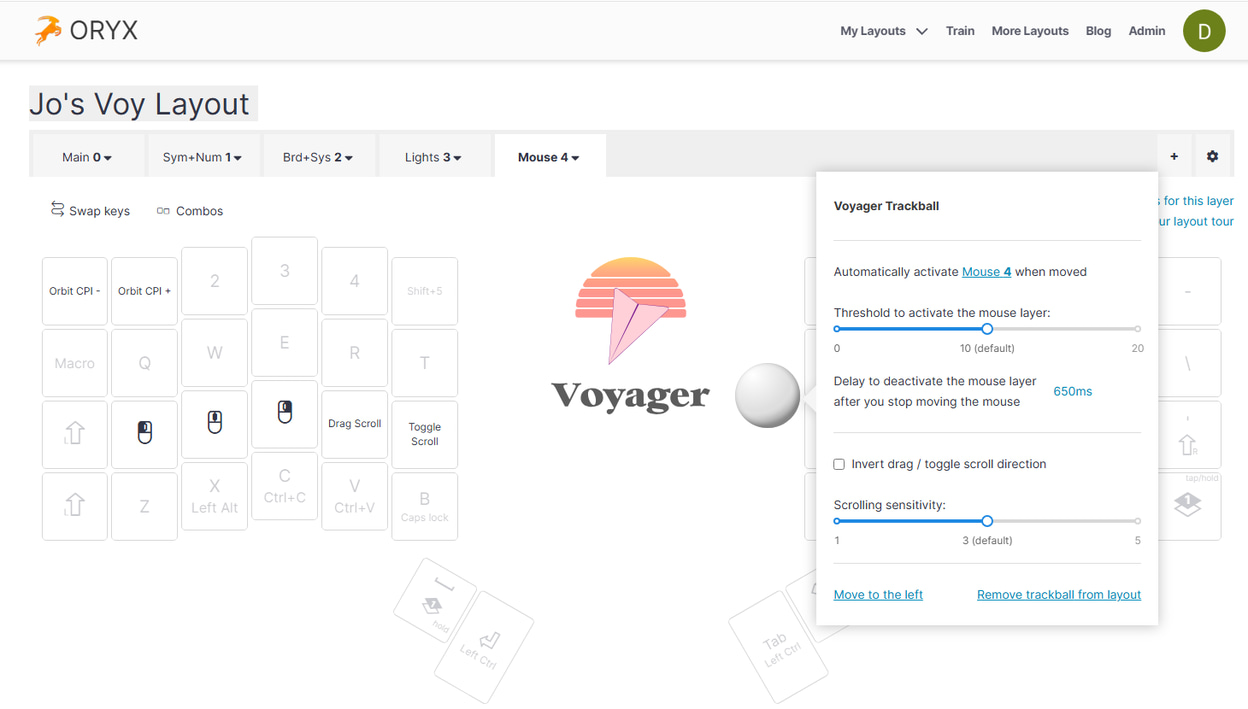
A few core settings can be found by clicking on the Navigator in Oryx.
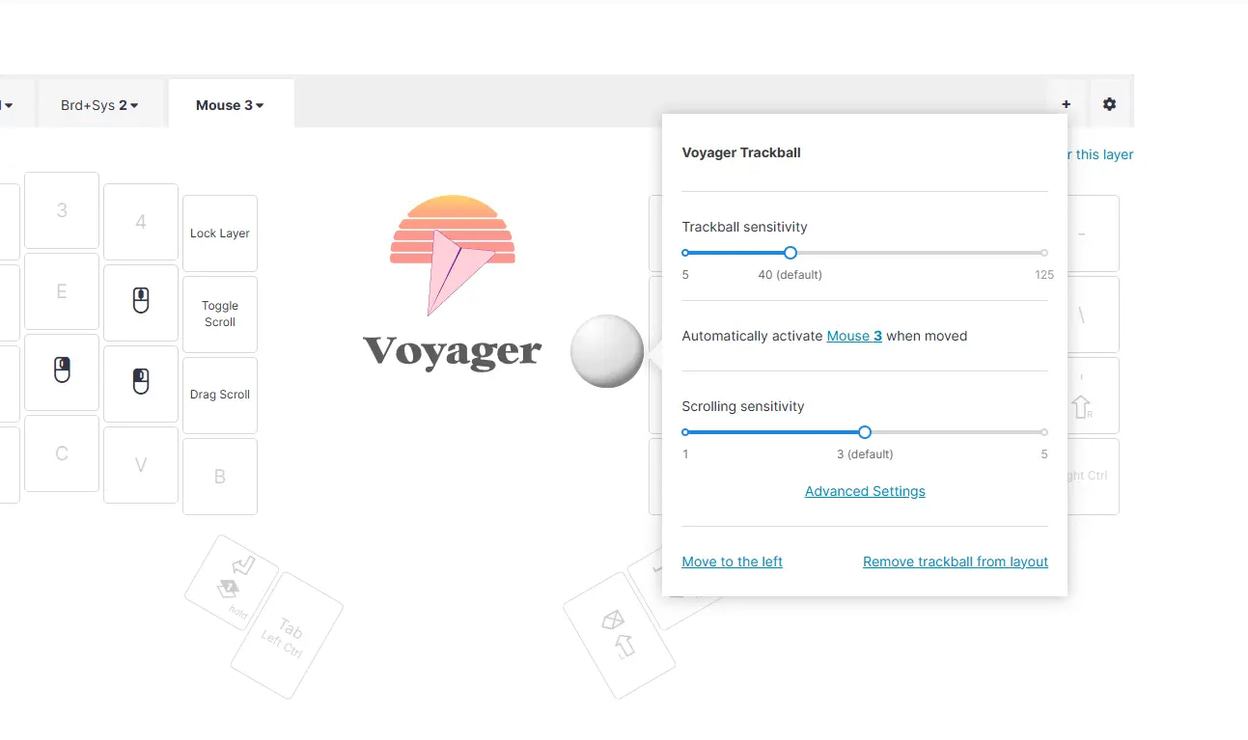
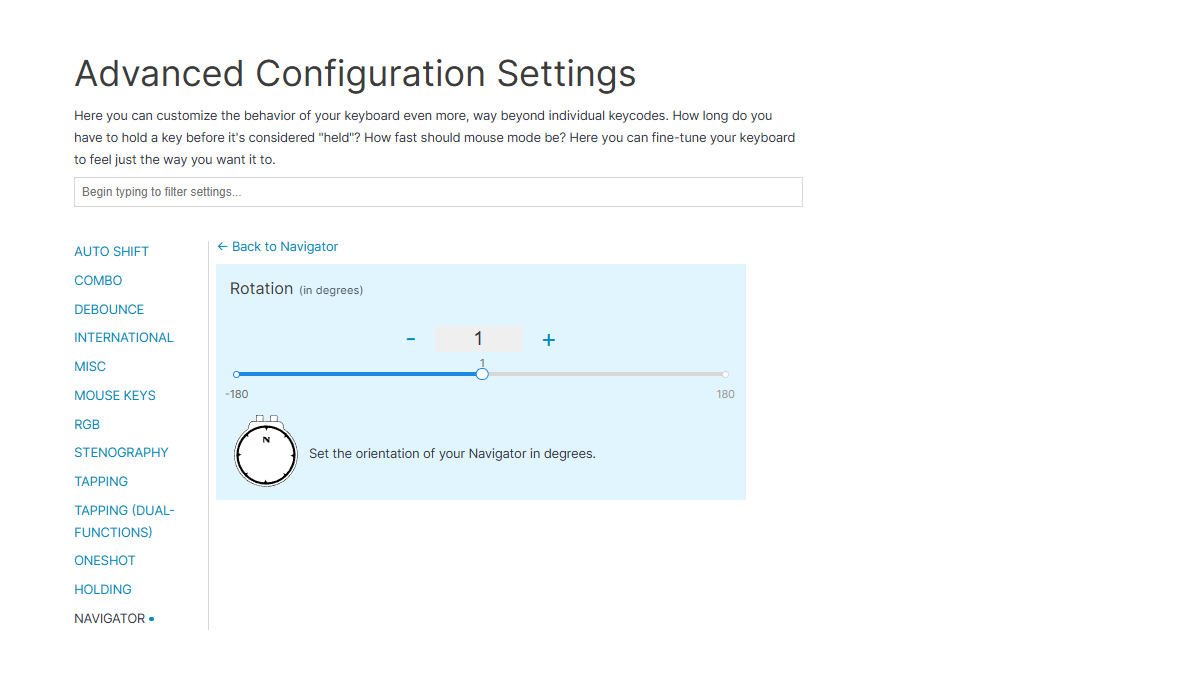
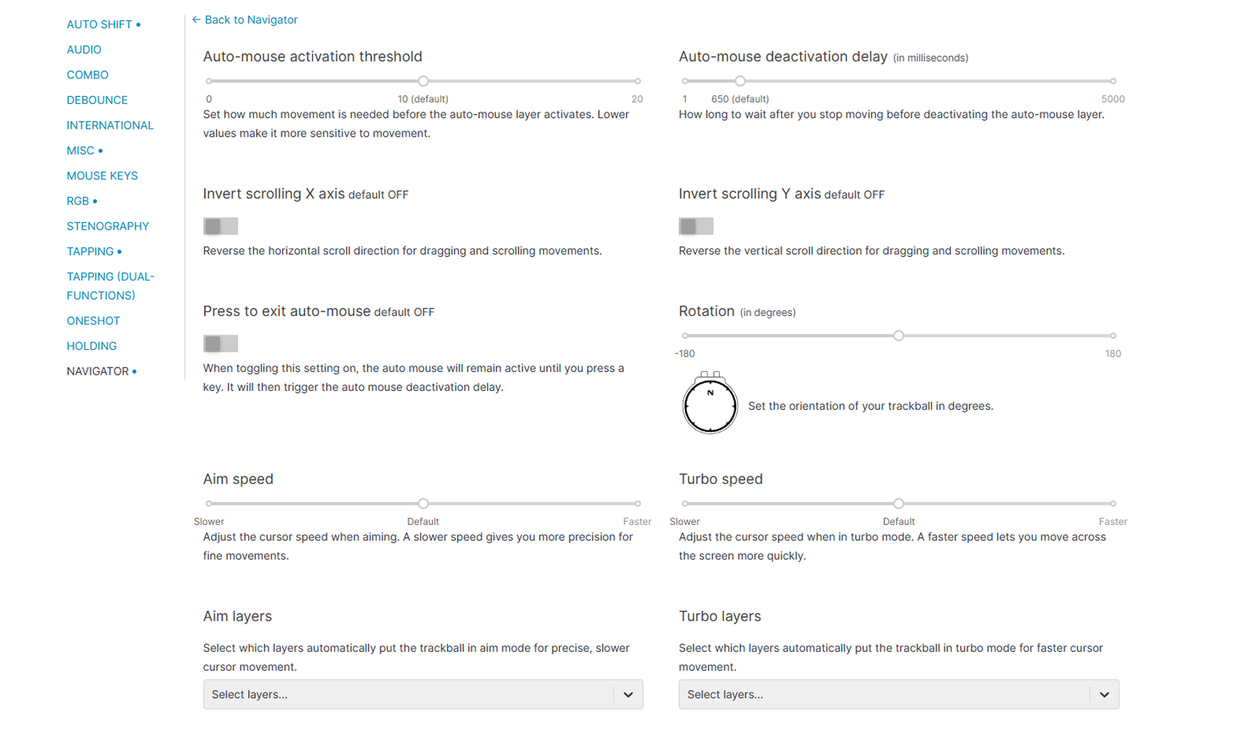
The rest of the Navigator settings are in the Navigator tab of your layout’s advanced settings.
Trackball Settings
Enabling Press to exit auto-mouse gives you a different way to use the auto-mouse layer. This mode toggles your auto-mouse layer on when you move the mouse, then waits to deactivate it until you’ve pressed a key (it’ll count down your Auto-mouse deactivation delay once you’ve pressed a key.)
You can invert the scroll direction of either axis, either in firmware through Oryx or in your operating system settings. Doing this in Oryx makes sense if you only want this to apply to the Navigator (that way any other mice on your computer will still scroll like they always have).
Raising Auto-mouse activation threshold can help if you are a particularly heavy typist or use the Trackball at a high tenting angle and notice the mouse layer activating while you type.
Setting the Rotation of your Navigator Trackball is useful if you plan to use a 3D-printed shell that changes the orientation of the Trackball, such as our thumb shell.
Trackpad Settings
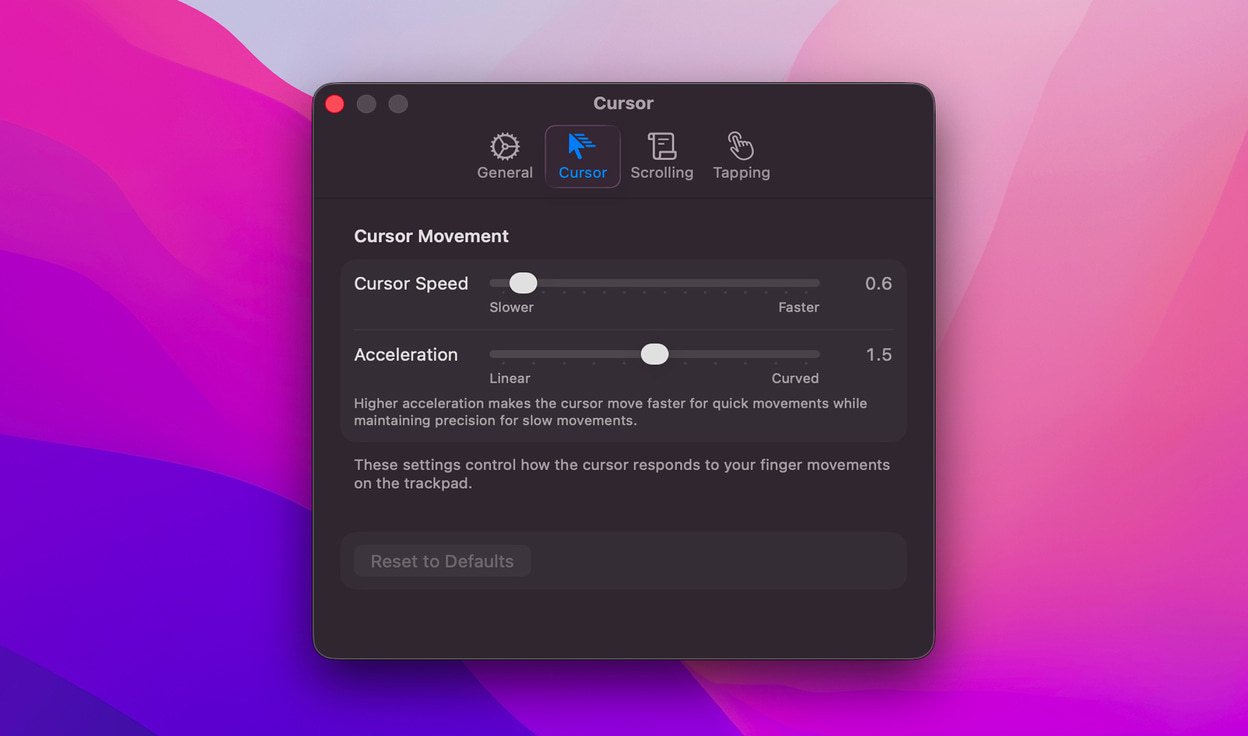
On Windows and Linux, the Trackpad will work as soon as you flash your new layout. You can adjust things like cursor speed in your operating system settings. When using the Navigator Trackpad in macOS, you will want our Navigator companion app to enable gesture support and smooth scrolling. The Trackpad will work without the app, but only for basic mouse movements. This is due to Apple’s lack of support for third-party devices.
When you first launch the companion app, you will need to grant it Accessibility permissions through macOS. Simply follow the prompts in the app. If you’ve used anything like Alfred, Karabiner Elements, even Zoom, you will be familiar with this process.
You'll find the Navigator companion app by clicking on the platypus icon in your menu bar. If you use any apps to manage your menu bar, like Bartender, be sure to check that the companion app is not hidden.
Clicking All Settings… brings up more configuration options for the Trackpad. Here are the most important ones as you get started:
Cursor Speed affects how fast your mouse pointer moves while Acceleration affects how much finger movement it takes to reach top speed. A faster Cursor Speed with linear Acceleration will be quite fast all the time while a slower Cursor Speed with a curved acceleration will be slow when moving your finger slowly and quickly speed up when moving your finger quickly. Try both settings somewhere in the middle to start and experiment to find what feels right.
Enable Kinetic Scrolling gives your scrolling momentum. Pages will continue to scroll after your fingers leave the Trackpad if you were scrolling quickly, like you are “throwing” the scrollbar. This type of scrolling is common and useful with the small Trackpad surface; we recommend leaving this enabled.
Tap Duration affects how much time you have to perform actions like double and triple-taps with the Trackpad. You may want to set this on the slow side while you practice, then you may find you can raise it, or you can just leave it if you like how it feels.
Movement affects how “off-center” your finger can be compared to your first tap when doing a double or triple-tap. A strict Movement setting would require you to hit almost the exact same point for it to count as a double-tap. A relaxed Movement setting would let your finger drift. We suggest most people start far on the relaxed side and adjust if it feels too easy to trigger.
Travelling with the Navigator
Unplug your Voyager’s USB-C cable, then disconnect the TRRS cables: first from the Voyager, then the Navigator.
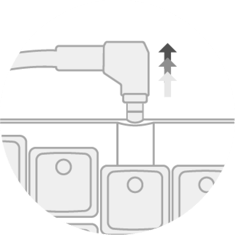
The Navigator attaches to the Voyager using magnets. To disconnect, gently but firmly push the Navigator down and away from the Voyager.
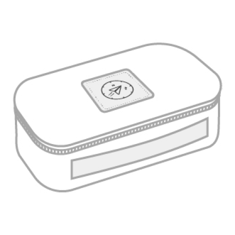
Into the carrying case it goes. We’ve sized the carrying case generously so the Navigator fits comfortably along with the cables. Zip up the high-quality YKK zipper, chuck it in your bag, and you’re ready to go.
Still have a question?
Robin, Nick, Mike, and Erez are here to personally help you. Please email us and we'll get back to you promptly — it is important for us that you have a great experience with your Navigator. ❤
contact@zsa.io